bugfloyd

Taming tech, one bug at a time.

  • Beginners Guide: Hosting WordPress on AWS with OpenLiteSpeed Using Terraform – The Most Minimal & Cost-Effective Setup

    Beginners Guide: Hosting WordPress on AWS with OpenLiteSpeed Using Terraform – The Most Minimal & Cost-Effective Setup

    WordPress is still cool, but you know what’s even cooler? Hosting WordPress in the cloud! For this series, I’m focusing on AWS. I’ll use Infrastructure as Code (IaC) and automation as much as possible!

    In this post, I’ll cover how to deploy WordPress websites on AWS in the most cost-efficient and simplest way with a minimal setup for small-scale websites. This setup can handle hosting multiple small WordPress websites simultaneously on a single instance. Later in this series, I’ll write more about how to create more scalable and enterprise deployments for more complicated setups.

    You can find the code for this post on this GitHub repository.

    Who is This Post for?

    Although I assume you have some initial knowledge about AWS, I’ll try to explain all the used resources briefly and provide links to the related AWS documentation for further information. Also, if you’re new to Terraform, don’t worry! You can use this post as an entry point. Just follow the process with me and check the provided links to Terraform documentation if you need to dive deeper into the concepts.

    I assume you’re using a Unix-based OS like Linux or macOS, but you should be able to run most of the commands on a Windows machine without needing to change anything. If they don’t work, just Google or ask an AI for their equivalent.

    Used Resources, Technologies and Stacks

    We’ll use these resources from AWS for this deployment:

    • Route 53: The domain name system to address DNS requests.
    • VPC: The private cloud network being used by all the resources.
    • EC2: To host the web server and the WordPress setup.
    • S3 (optional): To act as Terraform remote backend and store the state.

    We also use these tools and stacks in this project:

    • Terraform: To automate the deployments and cloud resource management.
    • AWS CLI: To configure access to AWS resources.
    • OpenLiteSpeed AMI: To be used as the machine image on our EC2 instance with pre-installed OpenLiteSpeed, LSPHP, MariaDB (MySQL), phpMyAdmin, LiteSpeed Cache, and WordPress! You can either use the ready-to-use AMI from AWS Marketplace with a small monthly payment, or build your own custom, flexible, and free AMI that I explained earlier in this post: The Ultimate AWS AMI for WordPress Servers: Automating OpenLiteSpeed & MariaDB Deployment with Packer and Ansible. An important bonus for using this approach is having a proper backup solution in place, which is critical for this setup considering that we’re storing everything in a relatively fragile EC2 instance.

    General Architecture

    First of all, I need to remind us that this post is about one of the most simple but secure ways to host WordPress on AWS. Some other solutions might sound more scalable, robust, and secure. I’ll gradually post tutorials for more scalable enterprise setups in the future. I’ll also mention possible improvements related to each section or resource in this post.

    AWS has released a whitepaper about hosting WordPress and it has a reference architecture which looks like this:
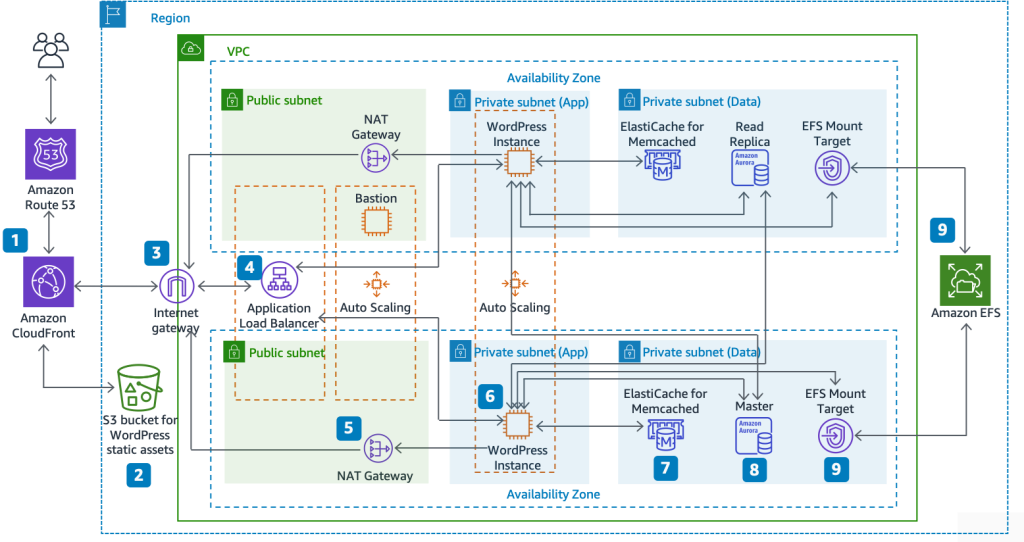
    A system design diagram from AWS Whitepaper showing the reference architecture to host WordPress on AWS

    As you can see, it’s quite complex and definitely overkill for a small business or personal website. Later in this series, I’ll definitely cover this architecture and automate it using Terraform, but for now we want to start small with the most basic components to host a working, fast, and secure WordPress website on AWS.

    Here’s the overview of the architecture that we’re going to follow in this tutorial:
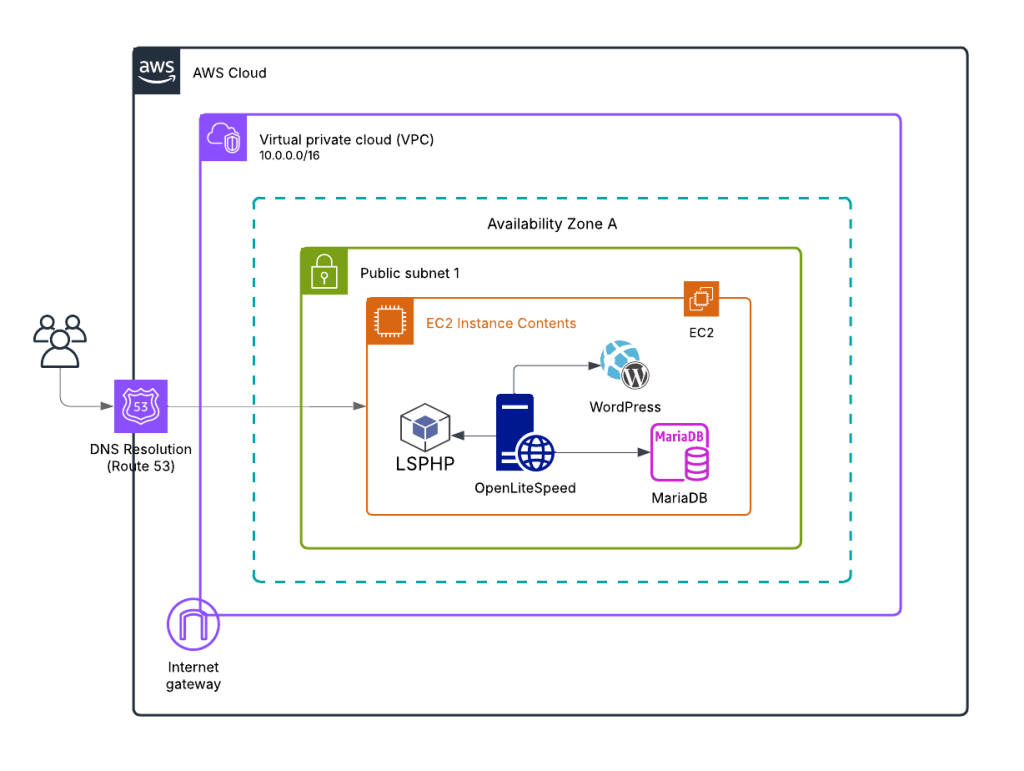
    A system design diagram showing the architecture we are following in this post to host WordPress on AWS

    As you can see, it’s a lot simpler than the reference architecture. I made these simplifications compared to the AWS reference architecture:

    • Removed CloudFront (CDN layer)
    • Skipped storing static files on S3
    • Removed Application Load Balancer
    • Removed NAT Gateway
    • Used a single public subnet to provide connectivity to all the components and removed the private subnets
    • Used a single replica setup instead of the Auto Scaling group of Amazon EC2 instances
    • Used a DB instance (MariaDB) inside the web server (EC2) instance instead of using separate instances for DB or using AWS RDS service
    • Hosted WordPress files inside the EC2 instance instead of EFS
    • Removed ElastiCache for Memcached

    Monthly Costs

    Let’s talk numbers before we dive into the implementation. One of the main advantages of this minimal setup is cost-effectiveness. Here’s a rough breakdown of what you can expect to pay monthly:

    • EC2 instance: Around $18 for a t3.small or similar instance running 24/7
    • Route 53: Approximately $0.50 for DNS management
    • VPC, networking and other EC2-related resources: About $5 per month

    This adds up to roughly $24 per month for the entire setup. Keep in mind that these aren’t exact numbers and might differ from region to region. Also, these figures don’t include applicable taxes, which will vary based on your location and billing address.

    The best part? This setup isn’t limited to a single WordPress website! You can actually host multiple small websites using this configuration, as long as they don’t have a lot of visitors or overlapping peak times. OpenLiteSpeed is efficient enough to handle several low-traffic sites on a single instance, making this an extremely cost-effective solution for freelancers, small agencies, or hobbyists managing multiple projects.

    If your sites start gaining more traffic or if performance becomes an issue, that’s when you might need to consider scaling up to the more robust architectures I’ll cover in future tutorials. But for getting started or for sites with modest traffic, this $25/month solution is hard to beat!

    Why OpenLiteSpeed?

    OpenLiteSpeed is an open-source version of LiteSpeed Web Server, and it’s becoming increasingly popular for WordPress hosting. But why am I choosing it for this setup? Let me break it down:

    First, it’s blazingly fast! OpenLiteSpeed consistently outperforms other web servers like Apache and Nginx in benchmarks, especially for WordPress sites. This performance boost comes from its event-driven architecture and optimized processing of dynamic content.

    Second, it has native caching capabilities through the LSCache plugin for WordPress. This is a game-changer for WordPress performance, offering server-level caching that’s much more efficient than plugin-based solutions. And the best part? It’s completely free, unlike the commercial LiteSpeed version which requires licensing fees.

    Third, it’s secure and stable. OpenLiteSpeed comes with built-in security features and is regularly updated to address vulnerabilities. Its resource efficiency means your small EC2 instance won’t be overwhelmed even during traffic spikes.

    Fourth, it’s surprisingly easy to set up and manage, especially when using a pre-configured AMI as I had explain in this tutorial. The web-based admin interface makes configuration a breeze compared to editing text files in Apache or Nginx.

    Finally, it offers excellent PHP handling through LSPHP (LiteSpeed PHP), which is optimized for performance and memory usage. This means your WordPress site will run more efficiently on smaller (and cheaper!) EC2 instances.

    While Apache might be more widely used and Nginx is popular for its reverse proxy capabilities, OpenLiteSpeed gives us the perfect balance of performance, ease-of-use, and cost-effectiveness for our minimal WordPress setup. It’s like having enterprise-level performance without the enterprise-level complexity or price tag!

    Why Terraform?

    Because I love it! It’s so simple and developer-friendly but powerful, modular, flexible, and extendable. I’ve spent hundreds of hours configuring and deploying cloud resources on AWS using CDK and CloudFormation. But in my personal opinion, Terraform shines in the IaC muddy ground!

    Terraform’s declarative approach means you describe the desired state of your infrastructure, and it figures out how to make it happen. This is much more intuitive than writing procedural code or wrangling with YAML files that feel like they’re from another dimension.

    Another huge advantage is that Terraform isn’t provider-specific. Once you learn the Terraform syntax and workflow, you can apply those skills to provision resources on AWS, Google Cloud, Azure, DigitalOcean, or dozens of other providers. It’s like learning one language that lets you speak to all the clouds!

    The Terraform ecosystem is also incredibly rich with modules that you can reuse. Need a VPC with all the trimmings? There’s probably a module for that. Want to deploy a complex application? Someone’s likely already shared a module that gets you 80% of the way there.

    For our WordPress setup, Terraform means we can spin up the entire infrastructure with a few commands, tear it down when we don’t need it (saving money!), and easily replicate it for different environments or clients. We can also easily add extra WordPress websites to our setup by simply updating our Terraform code – no need to manually configure new domains or virtual hosts. It’s the difference between building with Lego (structured, reusable pieces) versus sculpting with clay (custom but harder to modify).

    Okay, let’s get our hands dirty and host a WordPress instance on AWS!

    (more…)
  • The Ultimate AWS AMI for WordPress Servers: Automating OpenLiteSpeed & MariaDB Deployment with Packer and Ansible

    The Ultimate AWS AMI for WordPress Servers: Automating OpenLiteSpeed & MariaDB Deployment with Packer and Ansible

    Deploying a web application on AWS Elastic Compute Cloud (EC2) usually means setting up a server with the right software, configurations, and optimizations. But let’s be honest—doing this manually over and over again gets old fast. Instead of setting up everything from scratch each time, Amazon Machine Images (AMIs) let us create a pre-configured system that we can reuse whenever we need to spin up a new EC2 instance.

    And instead of doing this manually every time that we need to change something in the AMI, we’ll use Packer to automate the entire process. But before we get into that, let’s break down what an AMI actually is and why you might want to build your own.

    What is an AMI?

    An Amazon Machine Image (AMI) is essentially a blueprint for an EC2 instance. It includes everything needed to launch a server: the operating system, installed software, configurations, and optional application code. Instead of setting up a fresh instance manually each time, you can use an AMI to deploy identical instances quickly and reliably.

    Amazon Machine Image (AMI) logo

    Think of it like making a pizza at home. You could start from scratch every time—making the dough, preparing the sauce, chopping toppings—but why bother when you can just freeze a fully prepared pizza and bake it whenever you’re hungry? An AMI is that prepped pizza, ready to go. But unlike frozen food, an AMI doesn’t mean sacrificing quality or control. You still get a fresh, optimized setup—just without the hassle of doing it all over again.

    For those who want to skip ahead, the complete solution with all scripts and configurations is available on my GitHub repository: aws-ols-mariadb-ami.

    Why Build a Custom AMI?

    When launching an EC2 instance, you have three main options:

    1. Start from scratch – Use a bare Linux AMI, launch an instance, SSH in, and manually install and configure everything. This gives you full control but is tedious and time-consuming.
    2. Use a prebuilt AMI from AWS Marketplace – These come with software pre-installed, saving setup time, but many require a paid subscription and often include extra software you don’t need.
    3. Build your own custom AMI – The best of both worlds! You get a pre-configured, lightweight setup, tailored to your needs, with only the software you actually use—no unnecessary bloat or extra costs.

    In my previous posts, I explained how to use the OpenLiteSpeed AMI from the AWS Marketplace. It’s a convenient option, but it costs $5 per month. The funny thing? Everything inside that AMI is open-source and free. So instead of paying for it, we can build our own version. This saves money, allows full customization, and lets us configure it once and reuse it as many times as we need. Plus, we can skip unnecessary packages, keeping our AMI lightweight.

    In this post, I’ll walk through how to build a custom AMI based on Ubuntu 24.04, with these software and packages preinstalled and configured:

    • OpenLiteSpeed (with LiteSpeed Cache)
    • PHP (LSPHP)
    • MariaDB (Server & Client)
    • phpMyAdmin
    • WordPress

    And instead of doing this manually every time that we need to change something in the AMI, we’ll use Packer to automate the entire process.

    What is Packer?

    HashiCorp Packer logo

    Packer, created by HashiCorp, is a tool that automates machine image creation. Instead of manually setting up an instance and then taking a snapshot, Packer does everything for you. You define a template (in JSON or HCL), and Packer spins up a temporary server, installs and configures everything, then saves the final golden image as an AMI.

    Why does this matter? Manually setting up AMIs is repetitive, time-consuming, and error-prone. With Packer, you define everything once, and it builds AMIs on autopilot. Need an update? Just tweak the template and rebuild—no clicking around AWS wondering what you forgot.

    In short: Packer Automate AMI creation instead of doing it manually. Ensure consistency across deployments. Save time and avoid configuration headaches.

    Before we get into Ansible, let’s break down how Packer actually works. Packer doesn’t just magically create an AMI—it follows a process with two key components: builders and provisioners.

    • Builders are responsible for creating the machine image. In our case, the Amazon EC2 builder launches a temporary EC2 instance, installs everything needed, and then snapshots it into an AMI.
    • Provisioners handle installing software and configuring the system. Once the instance is up, provisioners take over to set up services, install dependencies, and customize the system before the image is finalized.

    While Packer supports different provisioners, including raw shell scripts, a more structured approach makes things easier to maintain—which brings us to Ansible. If Packer is the robot that builds your AMI, then Ansible is the smart assistant making sure everything inside is set up exactly the way you want.

    What is Ansible?

    Ansible is an automation tool for configuring servers, installing software, and managing infrastructure—without manually SSH-ing into each machine. Instead of writing long, brittle shell scripts, you define what needs to be done in simple YAML playbooks, and Ansible handles the rest.

    What makes Ansible special?

    Ansible logo
    • Agentless – Unlike other automation tools, Ansible doesn’t require any extra software to be installed on the target machine. It just connects over SSH and runs commands.
    • Declarative – Instead of telling the system how to install and configure things step by step, you describe what the final state should be, and Ansible figures out the rest.
    • Idempotent – Running an Ansible playbook multiple times won’t cause issues. If something is already installed or configured, Ansible just skips it, preventing unnecessary work.

    Why Use Ansible with Packer Instead of a Shell Script?

    Meme: Why write automation if you could automate automation

    Packer has a Shell provisioner, so why not just use bash scripts? Well, while shell scripts work, they have drawbacks:

    • Harder to maintain – Bash scripts can quickly turn into a tangled mess of commands and conditionals. Ansible uses structured, declarative YAML playbooks that are easier to read and modify.
    • Idempotency – As mentioned above, Ansible won’t re-run commands but shell scripts happily reinstall everything, every time.
    • Better error handling – If something fails in Ansible, it fails gracefully, showing exactly where and why. A shell script might just stop mid-way, leaving your setup half-broken.
    • More flexibility – Ansible modules allow for cleaner and more portable provisioning logic compared to writing a bunch of apt-get or yum commands.

    How It Works with Packer

    Once Packer spins up a temporary EC2 instance, Ansible takes over as the provisioner, installing software, configuring services, and making sure everything is properly set up before the AMI is saved.

    Now that we know why AMIs make life easier, how Packer automates the heavy lifting, and why Ansible keeps everything neat and organized, it’s time to roll up our sleeves and build our own custom AMI!

    (more…)
  • Build a Robust S3-Powered Backup Solution for WordPress Hosted on OpenLiteSpeed Using Bash Scripts

    Build a Robust S3-Powered Backup Solution for WordPress Hosted on OpenLiteSpeed Using Bash Scripts

    I believe there’s no need to explain why we need proper automated backup solutions for our web servers! When it comes to WordPress, there are plenty of options. Many popular solutions involve installing plugins on WordPress that rely on WordPress cron jobs (WP-Cron) to run automatically. These plugins bundle the website files and dump the database tables using PHP capabilities.

    While these plugin-based solutions work well enough in most scenarios, I’ve noticed several important limitations:

    • Backing up an application through the application itself is inherently risky! If something goes wrong with WordPress, the plugin, or the web server running them, the entire backup process fails.
    • The process heavily relies on PHP and the web server’s limits, timeouts, and configurations—and a lot can go wrong.
    • It consumes significant resources, especially with larger websites containing millions of database records and thousands of files. This can keep your web server busy with backup jobs and prevent it from properly responding to actual user requests.
    • These solutions have built-in limitations—for example, you cannot backup the web server or underlying OS configurations.
    • To restore these backups, you need to first install and set up a basic WordPress instance, install and configure the backup plugin, and then run the restore process—hoping everything goes smoothly.
    • These solutions are limited to only a single website and if you want to properly backup multiple websites on the servers it gets more challenging.

    I know there are plenty of out-of-the-box solutions for server-level backups, but why install and configure another potentially bloated application with dozens of features you’ll never use? Instead, let’s create a simple but flexible backup solution tailored specifically for OpenLiteSpeed servers hosting WordPress sites, powered by bash scripts and easily deployable with Ansible (or manually)!

    Although we’re focusing on OpenLiteSpeed and MariaDB here, with some small tweaks, this solution can be adapted for other web servers like LiteSpeed Enterprise or nginx, and other database systems like MySQL.

    In this backup solution I am going to use AWS S3 to store the backups which offers a secure, scalable and relatively cheap remote storage.

    Backup on the server meme. A: Sever is crashed! B: Where is backup? A: On the server!

    In this post I assume you are running a Debian-based Linux distribution on the server (like Debian, Ubuntu, etc). If you are using other Linux distributions, you have to adjust the commands, scripts (and the playbook) accordingly by yourself.

    You can find the complete solution including all the scripts and the optional Ansible playbook in this GitHub repository.

    Understanding the Backup Requirements

    Before diving into our backup solution, let’s understand what we need to back up on a WordPress installation running on an OpenLiteSpeed web server.

    What Needs to Be Backed Up?

    A complete WordPress backup solution should cover the following critical components:

    1. Website Files: WordPress core, Themes and plugins,Uploads (images, videos, documents), and in summary whatever we have in the WordPress installation.
    2. Database Content: All the tables and records in the database being used by WordPress, which includes WP core tables and any possible custom tables created by plugins and themes. Database users and their associated privileges should also be included in the backups with clear mappings showing which user belongs to which database.
    3. Web Server Configuration: OpenLiteSpeed configuration files, virtual host settings, and SSL certificates need to be backed up to ensure your server configuration can be restored exactly as it was.
    4. System Configuration: A list of installed packages, cron jobs, and other critical system configurations that make your server environment unique.

    A good backup strategy should capture all these components in an automated, scheduled manner, storing output on a remote storage solution securely, while providing a straightforward restoration path.

    The bash scripts we’re going to build are designed to achieve all these goals by:

    • Automatically detecting websites, databases, and their associated users
    • Backing up to a temporary local directory before uploading to a remote storage (AWS S3) and cleaning up the local directory after a successful backup
    • Implementing proper error handling and logging throughout the process
    • Including a dedicated restoration script that makes recovery simple and reliable
    (more…)