Hey there, cloud enthusiasts! Remember that minimal WordPress hosting setup we built on AWS in my previous post? Well, it’s time to give it superpowers! In this follow-up tutorial, we’re going to take our AWS WordPress installation to the next level by integrating Amazon CloudFront – turning our already solid setup into a blazing-fast global content delivery powerhouse.
In my previous post, we created a cost-effective WordPress hosting environment using OpenLiteSpeed on a single EC2 instance with direct Route 53 routing. That setup works great for getting started, but now we’re ready to level up both performance and security.
By adding CloudFront to our architecture, we’ll:
- Dramatically improve page load times with global content caching
- Reduce the load on our EC2 instance (happy server = happy wallet!)
- Enhance security by shielding our origin server from direct exposure, providing better protection against attacks like DDoS
- Implement SSL using Amazon Certificate Manager (ACM) instead of using Certbot in the web server instance
If you haven’t checked out the previous tutorial yet, I’d recommend giving it a read first, as we’ll be building directly on that foundation without rehashing the basics. All set? Let’s dive in and make your WordPress site fly!
Used Resources, Technologies and Stacks
In addition to all the cloud resources and stacks from the previous post, we will also utilize these in the current post:
- AWS CloudFront: Content Delivery Network (CDN) with distributed global edge servers to cache and deliver content from locations closest to your users
- Amazon Certificate Manager (ACM): To generate and manage SSL certificates for HTTPS connections without the hassle of manual renewal or managing cron jobs in the web server
General Architecture
In this step, we’re getting one step closer to the AWS recommended reference architecture. This architecture is very similar to the minimal setup we used in the previous post. We’re just adding a CloudFront layer with related SSL certificate and logging features.
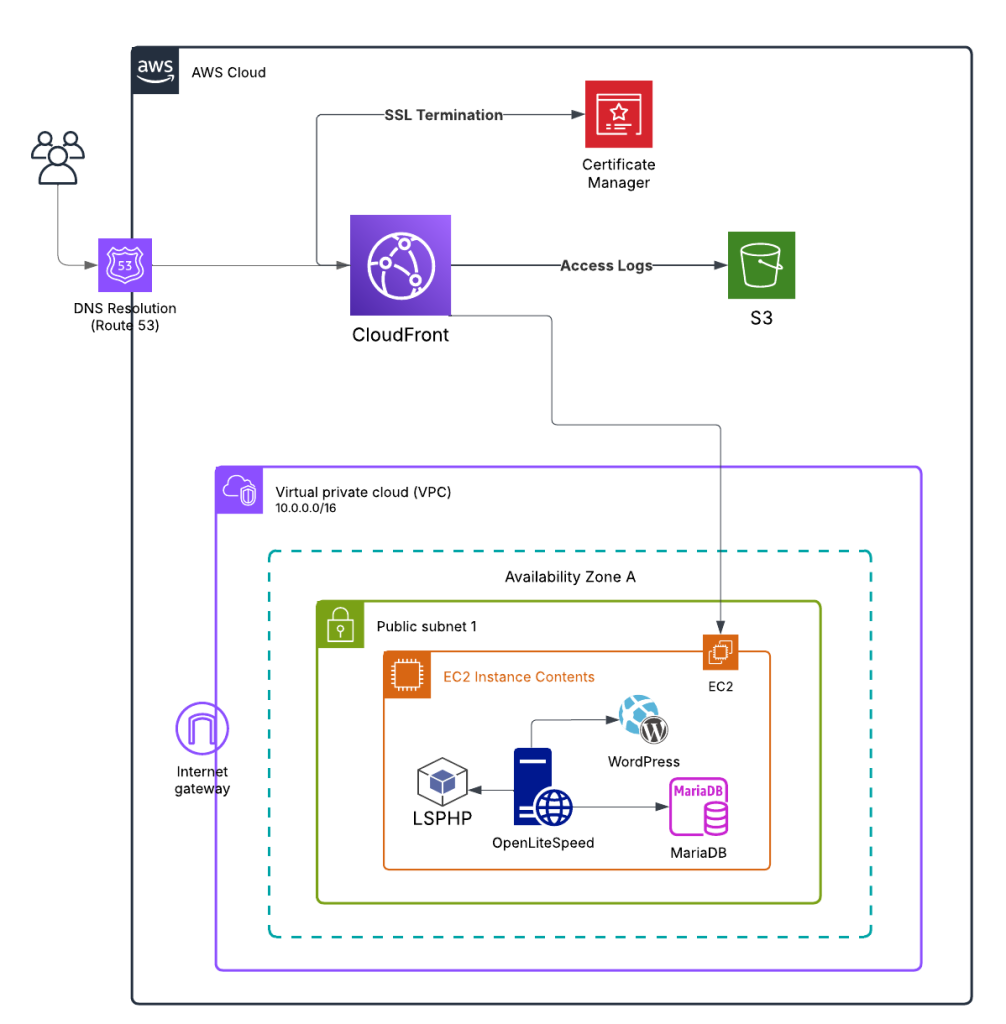
Here’s how it works:
- User visits the website, and your domain registrar points them to Name Servers (NS) hosted on AWS Route 53.
- Route 53 routes the request to CloudFront Distribution.
- CloudFront Distribution uses the certificate stored on Amazon Certificate Manager (ACM) to terminate the SSL.
- CloudFront checks if it has a matching cache for the request. If it does, it responds with the cached content; otherwise, it sends the request to the origin (the public DNS of our web server hosted on EC2 which has a public IP address in this setup).
- The web server OpenLiteSpeed runs WordPress using LiteSpeed PHP (LSPHP).
- WordPress uses the files on the instance’s file system and also the data on MySQL database (MariaDB) to generate the response.
Prerequisites
By following the previous post, I hope by now you know why we’re using OpenLiteSpeed and Terraform. You should also have the prerequisites ready, which include:
- AWS CLI and profile configuration
- Terraform
- An S3 bucket to be used for Terraform backend
- Terraform IDE extension
- A hosted zone deployed to AWS Route 53
- A domain pointed to the name servers of the hosted zone
- The main infrastructure code in Terraform: No need to have them deployed, but if you’re currently using it, by following this post and applying the changes, Terraform can help you easily migrate from the minimal setup to this one and add CloudFront. Of course, you’ll still need to manually update some configurations at the web server level, which we’ll cover later in this post (for example, SSL-related settings)
Main Infrastructure
For the main infrastructure code, I’m assuming you already have everything from the previous post. I’ll only mention the additions, changes, and possible removals compared to the previous setup. As before we keep the main infra code inside the infra directory.
First add a Terraform backend file infra/backend.tf.
Then we need to add a new variable to use it as the S3 bucket name to store CloudFront access logs:
# The rest of the variables from minimal setup
# ...

variable "cloudfront_logging_bucket_name" {
  description = "S3 bucket name to be used for CloudFront logs"
  type        = string
}Create a main file as before for now: infra/main.tf and add the AWS provider to it. Later we will come back to this file and add our sub-module to it.
The networking related infrastructure also should look the same (infra/network.tf)
Access Logs
CloudFront is capable of storing access logs in a S3 bucket. You can create this bucket and later use it in the CloudFront infra.
resource "aws_s3_bucket" "cloudfront_logging_bucket" {
  bucket = var.cloudfront_logging_bucket_name

  tags = {
    Name       = "WebsitesCloudFrontLogsBucket"
    CostCenter = "Bugfloyd/Websites/CloudFront"
  }
}

# Bucket Ownership Controls
resource "aws_s3_bucket_ownership_controls" "ownership_controls" {
  bucket = aws_s3_bucket.cloudfront_logging_bucket.id

  rule {
    object_ownership = "BucketOwnerPreferred"
  }
}

# Set ACL for LogDeliveryWrite
resource "aws_s3_bucket_acl" "logging_bucket_acl" {
  bucket     = aws_s3_bucket.cloudfront_logging_bucket.id
  acl        = "log-delivery-write"
  depends_on = [aws_s3_bucket.cloudfront_logging_bucket]
}

# Disable Bucket Versioning
resource "aws_s3_bucket_versioning" "logging_bucket_versioning" {
  bucket = aws_s3_bucket.cloudfront_logging_bucket.id

  versioning_configuration {
    status = "Suspended"
  }
}

# Lifecycle Policy:
# - Delete objects after 1825 days (5 years)
# - Delete noncurrent versions after 1 day
resource "aws_s3_bucket_lifecycle_configuration" "logging_bucket_lifecycle" {
  bucket = aws_s3_bucket.cloudfront_logging_bucket.id

  rule {
    id     = "log-expiration"
    status = "Enabled"

    expiration {
      days = 365
    }

    noncurrent_version_expiration {
      noncurrent_days = 1
    }
  }
}Here we first create the bucket itself, then to ensure that we are the owner of those logs and not CloudFront, we add a bucket ownership control. And although in general AWS recommends avoiding ACLs and using bucket policies, but CloudFront logging still depends on ACLs for writing logs. So we create one to provide the access to CloudFront to write the logs on this bucket. I also disable versioning on this bucket to save some money since no critical data is going to be stored on this bucket. At the end they are all logs! And again tos ave some costs and avoid having millions of log objects on the bucket, we configure life cycle for the objects in this bucket to expire (get deleted) after 365 days.
Web Server Instance
Finally! We can now define our core component which is the web server hosting WordPress!
First let’s create a network interface that we can attach to the web server instance to provide network connectivity to it. We also restrict the access to this instance to specific sources (ourselves a.k.a admins + CloudFront).
resource "aws_network_interface" "webserver" {
  subnet_id       = aws_subnet.public_a.id
  security_groups = [aws_security_group.ec2_web.id, aws_security_group.ec2_admin.id]

  tags = {
    Name       = "WebserverInstanceNetworkInterface"
    CostCenter = "Bugfloyd/Websites/Instance"
  }
}

# Security Group for EC2 Instance
resource "aws_security_group" "ec2_web" {
  name        = "WebsitesInstanceSecurityGroupWeb"
  description = "Security Group for the WordPress EC2 instance"
  vpc_id      = aws_vpc.bugfloyd.id

  ingress {
    description     = "Allow HTTP from CloudFront"
    from_port       = 80
    to_port         = 80
    protocol        = "tcp"
    prefix_list_ids = [data.aws_ec2_managed_prefix_list.cloudfront.id]
  }

  egress {
    from_port   = 0
    to_port     = 0
    protocol    = "-1"
    cidr_blocks = ["0.0.0.0/0"]
  }

  tags = {
    Name       = "WebsitesInstanceSecurityGroupWeb"
    CostCenter = "Bugfloyd/Websites/Instance"
  }
}

resource "aws_security_group" "ec2_admin" {
  name        = "WebsitesInstanceSecurityGroupAdmin"
  description = "Security Group for WordPress EC2 to allow admin access"
  vpc_id      = aws_vpc.bugfloyd.id

  ingress {
    description = "Allow TCP 7080 from admin"
    from_port   = 7080
    to_port     = 7080
    protocol    = "tcp"
    cidr_blocks = var.admin_ips
  }

  ingress {
    description = "Allow SSH from Instance Connect"
    from_port   = 22
    to_port     = 22
    protocol    = "tcp"
    cidr_blocks = var.admin_ips
  }

  egress {
    from_port   = 0
    to_port     = 0
    protocol    = "-1"
    cidr_blocks = ["0.0.0.0/0"]
  }

  tags = {
    Name       = "WebsitesInstanceSecurityGroupAdmin"
    CostCenter = "Bugfloyd/Websites/Instance"
  }
}

data "aws_ec2_managed_prefix_list" "cloudfront" {
  name = "com.amazonaws.global.cloudfront.origin-facing"
}Here we have created a network interface, have connected it to the public subnet that we created earlier, and have attached two security groups to it to restrict the access. Security groups plays a role similar to a cloud firewall in AWS. The first group allows CloudFront to connect to the instance on TCP port 80 for HTTP requests and the second one provides HTTP access to OpenLiteSpeed’s admin web console on TCP port 7080 and also SSH on TCP port 22 to admins only. If you do not have a static IP to pass, you can temporarily use ["0.0.0.0/0"] as the cidr_blocks to allow the whole world to connect to your admin console and establish SSH to the instance which is STRONGLY not recommended!
Also note that to avoid hard-coding CloudFront IP addresses and CIDR blocks here (which might change in the future without notice), we use an AWS-managed prefix list and we import that list using Terraform’s data block.
Now we can finally define our web server EC2 instance.
resource "aws_key_pair" "websites_key_pair" {
  key_name   = "WebsitesKeyPair"
  public_key = var.admin_public_key

  tags = {
    Name       = "WebsitesInstanceKeyPair"
    CostCenter = "Bugfloyd/Websites/Instance"
  }
}

resource "aws_instance" "webserver" {
  ami           = var.ols_image_id
  instance_type = "t3.small"
  key_name      = aws_key_pair.websites_key_pair.key_name

  network_interface {
    network_interface_id = aws_network_interface.webserver.id
    device_index         = 0
  }

  root_block_device {
    volume_size = 20
  }

  tags = {
    Name       = "WebserverInstance"
    CostCenter = "Bugfloyd/Websites/Instance"
  }
}

output "webserver_instance_ip" {
  description = "The public IP address of the webserver EC2 instance"
  value       = aws_instance.webserver.public_ip
}First we create an EC2 key pair and pass our public key to it via the variables. And then the main EC2 instance is defined.
We can define some outputs for our resources to immediately get the important details of the resources after a deployment in our terminal. For now I use a single output to print the IP address of the deployed Web Server instance
Choosing the Right AMI for the Web Server
Each EC2 instance needs to use an Amazon Machine Image (AMI) in order to boot and work. See the AMI as the OS with some pre-installed software and packages to be used for the instance. It can be an AWS-managed image like Amazon Linux, or a specific distribution AMI like Ubuntu AMIs.
For our web server we have a couple of options:
- Use Bare minimum ready AMIs: Use a bare AMI like Amazon Linux or Ubuntu and after the deployments SSH into the instance and install and configure the necessary packages like OpenLiteSpeed, MySQL, phpMyAdmin and the WordPress itself. This option is really neither scalable nor maintainable. And it is hard to automate.
- Build and store our own custom AMI: This is the recommended way to have a scalable and manageable deployments. It is similar to the previous options, but we do it once and then create the AMI out of the instance we created and store the image on AWS, so later if we boot up a new instance using this AMI, we would have all of those packages installed and configured out of the box. I covered this topic in this post. (TODO)
- Using an already built AMI: There are tons of ready to use AMIs out there. You can find many in AWS Marketplace. You have to subscribe to these AMIs and pay a hourly or monthly price for the. Some of these AMIs offer free trials.
For the sake of simplicity in this post I am going to use an AMI from AWS marketplace officially distributed by LiteSpeed Technologies Inc. The AMI is based on Ubuntu 24.04 and called WordPress With OpenLiteSpeed and LiteSpeed Cache and includes these components pre-installed and configured:
- OpenLiteSpeed
- MariaDB
- phpMyAdmin
- LiteSpeed Cache
- memcached
- redis
- Certbot
- Postfix
- WordPress
Its subscription costs $0.007 per hour ($5 per month). To proceed with this post open its page on AWS marketplace and accept the terms and subscribe to the product. Then click on the “Continue to Configuration” button and on the other screen when it suggests, DO NOT launch an instance and instead just write down the AMI ID that it provides for the latest version of the software and the region of your choice. We are going to use it later while deploying the resources. Note that each region has a different AMI.
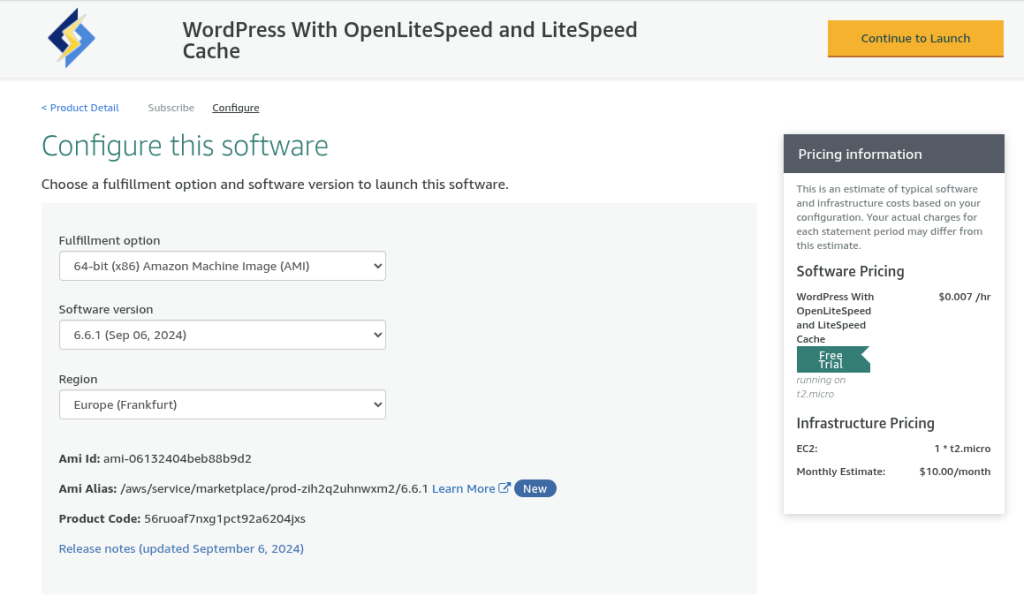
In my case the ID that I need is ami-06132404beb88b9d2 but this changes and may be different for you, so make sure to use the ID you get from AWS marketplace.
After subscribing to this AMI you have 7 days of trial period and you can see, manage and cancel the active subscriptions on your account via Marketplace: Manage Subscriptions page on AWS console.
I personally use a custom AMI to host my websites which is more flexible and also free! You can follow the current post by using the AMI ID from the subscription above and later during its trial period decide to keep using it or switch to another option, or just head to the other post and follow it to build your own free custom AMI and then come back here and use it! (TODO)
Choosing the Right EC2 Instance Size for WordPress
I am using t3.small instance type, but you can replace it with other types based on your needs. I suggest sticking with T3 (Intel-based) or T3a (AMD-based) types as they are more efficient. Also check this guide about instance type naming conventions. On this page you can find the available sizes for T3 and T3a families. Do not use a nano sized instance since there is no enough memory for a web server on those instances. And if you decide to use micro size, be aware that you might still encounter some memory issues and the instance might crash and reboot. I found small size the most reliable and cost-efficient size. Also if you feel the need to use one of the bigger sizes like 2xlarge, you might need to reconsider your system design and architecture. Overall I recommend sticking to one of these types:
| Name | vCPUs | Memory (GiB) |
t3.small, t3a.small | 2 | 2.0 |
t3.medium, t3a. | 2 | 4.0 |
t3.large, t3a.large | 2 | 8.0 |
t3.xlarge, t3a.xlarge | 4 | 16.0 |
Even the small sized instances might be able to handle hosting 5-10 WordPress websites if there are no a lot of concurrent users and visitors. Also keep in mind that we are going to add CloudFront caching to this setup, so even with hundreds of visitors at the same time, you shouldn’t face any issue, since theoretically most of those requests will not reach the instance and a cached version of the pages would be served. But for example if you have 5e-commerse websites using WooCommerce with a lot of active buyers, then you need the instance to handle those requests dynamically and a small instance probably won’t be the right choice. So in summary, for a new websites start with small, and monitor the resources usage and increase the size if you see a lot of peak moments with usage shortage.
Also be aware that disk size is not coupled with the instance size and youc an add disk space to either of these instances. In our case, I am adding a 20GiB volume for the root partition.
You can check AWS pricing for on-demand EC2 instances here.
Domain-Specific Infra
Since I assumed that we might have multiple websites (domains), to avoid the duplicated resource definitions for website-specific resources like the CloudFront distribution and SSL certificates, we need to create a Terraform module, define all the domain-specific resources in that module and then use the module to loop through all of the domains to deploy the actual resources.
To define a new module, create a new directory in your main infra directory: aws-wordpress/infra/websites. Each Terraform module is independent, so we need to define the variables that we are using in this module.
variable "domain" {
  description = "Domain name for SSL certificate and redirects"
  type        = string
}

variable "hosted_zone_id" {
  description = "The Hosted Zone ID for the domain"
  type        = string
}

variable "instance_public_dns" {
  description = "The public DNS for the EC2 instance"
  type        = string
}

variable "logging_bucket" {
  description = "S3 bucket used for CloudFront distribution logs"
  type        = string
}Then let’s create the providers being used in this module and also a local for tags.
terraform {
  required_providers {
    aws = {
      source                = "hashicorp/aws"
      version               = "~> 5.88"
      configuration_aliases = [aws.us_east_1]
    }
  }
}

locals {
  tags = {
    Website = var.domain
  }
}This module need the standard AWS provider to work. We also need to create an alias for the provider in us-east-1 region as we are going to use this to deploy the SSL certificates. In AWS SSL certificates used in CloudFront distributions strictly need to be deployed to us-east-1 region. Later while using this module we will provide this alias provider.
I have added a local to store the default tags for this module. If we consider Terraform input variables as arguments to our configuration, Terraform locals resources would be like scoped variables that we can define and reuse some values within a single module. Here I create a local named tag and add the website name as a new tag so that I can use this local in the resources of this module to have the website name for each of the created resources.
SSL Certificate
Now it is the time to create SSL certificates using AWS Certificates Manager (ACM).
resource "aws_acm_certificate" "cloudfront_cert" {
  provider          = aws.us_east_1
  domain_name       = var.domain
  validation_method = "DNS"

  subject_alternative_names = [
    "www.${var.domain}"
  ]

  lifecycle {
    create_before_destroy = true
  }

  tags = merge(local.tags, {
    Name       = "${var.domain}-CloudFrontACMCertificate"
    CostCenter = "Bugfloyd/Websites/CloudFront"
  })
}

resource "aws_route53_record" "cert_validation" {
  for_each = {
    for dvo in aws_acm_certificate.cloudfront_cert.domain_validation_options :
    dvo.domain_name => {
      name   = dvo.resource_record_name
      record = dvo.resource_record_value
      type   = dvo.resource_record_type
    }
  }

  zone_id = var.hosted_zone_id
  name    = each.value.name
  type    = each.value.type
  records = [each.value.record]
  ttl     = 60
}

resource "aws_acm_certificate_validation" "cert_validation" {
  provider                = aws.us_east_1
  certificate_arn         = aws_acm_certificate.cloudfront_cert.arn
  validation_record_fqdns = [for record in aws_route53_record.cert_validation : record.fqdn]
}We request a SSL certificate for the current domain which is being processed in the module and its www subdomain. Don’t forget that we explicitly override the default provider for this resource with aws.us_east_1 alias provider.
To issue a SSL certificate we have to prove that we own the domain. I chose DNS as the validation method since it is easier to automate its process by defining a DNS record in our hosted zone (that we have already created in the previous section) and defining a aws_acm_certificate_validation resource. This resource represents a successful validation of an ACM certificate and it does not represent a real-world entity in AWS. It is just a check to see if the certificate is validated and issued so that we can continue using it in the other resources.
CloudFront Infra
The other domain-specific resource that we need to create is a CloudFront distribution and its related resources. CloudFront is the CDN service of AWS and if you don’t know how it works, I recommend checking this documentation. In nutshell CloudFront distribution received the requests from Route 53 and terminates the SSL using ACM certificate and then either serves a cached version for the response (if it finds a matching cache) or it forwards the request to the origin (the web server) so that it can calculate a new respond and then it stores the new response in the cache storage.
resource "aws_cloudfront_distribution" "cloudfront" {
  comment = "CloudFront for ${var.domain}"

  aliases = [
    var.domain,
    "www.${var.domain}"
  ]

  enabled         = true
  http_version    = "http2"
  is_ipv6_enabled = false

  origin {
    domain_name        = var.instance_public_dns
    origin_id          = "EC2Origin"
    connection_timeout = 10

    custom_origin_config {
      http_port                = 80
      https_port               = 443
      origin_protocol_policy   = "http-only"
      origin_ssl_protocols     = ["TLSv1.2"]
      origin_keepalive_timeout = 60
      origin_read_timeout      = 30
    }
  }

  default_cache_behavior {
    target_origin_id       = "EC2Origin"
    viewer_protocol_policy = "redirect-to-https"

    allowed_methods = ["HEAD", "DELETE", "POST", "GET", "OPTIONS", "PUT", "PATCH"]
    cached_methods  = ["GET", "HEAD", "OPTIONS"]

    cache_policy_id          = aws_cloudfront_cache_policy.cache_policy.id
    origin_request_policy_id = "33f36d7e-f396-46d9-90e0-52428a34d9dc"

    compress = true
  }

  viewer_certificate {
    acm_certificate_arn      = aws_acm_certificate_validation.cert_validation.certificate_arn
    ssl_support_method       = "sni-only"
    minimum_protocol_version = "TLSv1.2_2021"
  }

  logging_config {
    bucket          = "${var.logging_bucket}.s3.amazonaws.com"
    prefix          = "${var.domain}/web/"
    include_cookies = true
  }

  restrictions {
    geo_restriction {
      restriction_type = "none"
    }
  }

  tags = merge(local.tags, {
    Name       = "${var.domain}-CloudFrontDistribution"
    CostCenter = "Bugfloyd/Websites/CloudFront"
  })
}

resource "aws_cloudfront_cache_policy" "cache_policy" {
  name = "${replace(var.domain, ".", "_")}-cache-policy"

  default_ttl = 86400
  max_ttl     = 31536000
  min_ttl     = 0

  parameters_in_cache_key_and_forwarded_to_origin {
    cookies_config {
      cookie_behavior = "none"
    }

    headers_config {
      header_behavior = "whitelist"
      headers {
        items = ["Host", "Options"]
      }
    }

    query_strings_config {
      query_string_behavior = "all"
    }

    enable_accept_encoding_brotli = true
    enable_accept_encoding_gzip   = true
  }
}

resource "aws_route53_record" "main_dns_record" {
  zone_id = var.hosted_zone_id
  name    = var.domain
  type    = "A"

  alias {
    name                   = aws_cloudfront_distribution.cloudfront.domain_name
    zone_id                = "Z2FDTNDATAQYW2" # CloudFront's Hosted Zone ID
    evaluate_target_health = false
  }
}

resource "aws_route53_record" "www_dns_record" {
  zone_id = var.hosted_zone_id
  name    = "www.${var.domain}"
  type    = "A"

  alias {
    name                   = aws_cloudfront_distribution.cloudfront.domain_name
    zone_id                = "Z2FDTNDATAQYW2" # CloudFront's Hosted Zone ID
    evaluate_target_health = false
  }
}The main resource here is the CloudFront distribution. Let’s dive into its important arguments and configuration:
aliases: Domains being used with this distribution.http_version: Maximum HTTP version to support on the distribution.origin: Each distribution can have one or many origins that it forwards the requests to. Here we define a custom origin for our web server. For itsdomain_namewe provide the public DNS address of our EC2 instance. We have to providehttps_portandorigin_ssl_protocolssince they are required arguments, but they are not going to be used sinceorigin_protocol_policyis set tohttp-only. As mentioned before, CloudFront is goint to terminate the SSL and the connection between CloudFront and the web server is insecure (HTTP). Although it is not a hard requirement, but later in this post series I will cover the other scenarios to also secure this part of the connection. For each origin we also need to define a kind of tag namedorigin_idand later in cache behavior definitions these tags need to be used so that CloudFront knows how to behave with the traffic related to different origins. The value for these IDs are arbitrary. Obviously in this case we only have a single origin and a singleorigin_id(EC2Origin).default_cache_behavior: Each distribution can have multiple cache behaviors for different path patterns (like/images/*or/api/*) and if none of them match the existing request, then thisdefault_cache_behavioris going to be used. In this case since we only need a single cache behavior, we define it as the default cache behavior. All the allowed HTTP methods for the website is defined inallowed_methods. We also specify which methods CloudFront should cache incached_methods.cache_policy_id: Every cache behavior needs ancache_policy_idwhich defines how the caching should work. We define our own cache policy using theaws_cloudfront_cache_policyTerraform resource and specify its configuration including:- TTLs
parameters_in_cache_key_and_forwarded_to_originwhich defines the parameters of the request that should be considered in the cache key and then forwarded to the origin. Whatever defined here is going to be used in the cache keys and also automatically forwarded to the origin when CloudFront doesn’t find a matching cache. Here we exclude cookies from cache keys and includeHostandOptionsheaders also all the query strings. This means that CloudFront will keep a separate cache for a request matchingexample.com?p=1andexample.com?p=2and behave them as separate responses (as they could be in WordPress). And CloudFront will not consider the cookie values to see it has an existing cache for the request or not.
origin_request_policy_id: Every caching behavior should have an origin request policy. In this policy it is possible to define which cookies, headers and query parameters to be passed to origin when there is no cache hit. We can either define our own policy using theaws_cloudfront_origin_request_policyresource, or used one of the AWS-managed policies. For the simplicity here I used the ID of the AWS-managedAllViewerAndCloudFrontHeaders-2022-06policy which forwards all the headers, cookies, and query strings to the origin. It also adds CloudFront specific headers to the forwarded request some of which could be useful and reduce the overhead from your application. Check the link.- Note that:
parameters_in_cache_key_and_forwarded_to_origin(fromaws_cloudfront_cache_policy)- Controls what gets included in the cache key.
- Also defines which parameters are forwarded to the origin, but only if no
aws_cloudfront_origin_request_policyis attached.
aws_cloudfront_origin_request_policy- Always takes precedence when attached to a cache behavior.
- Dictates what is forwarded to the origin, regardless of
parameters_in_cache_key_and_forwarded_to_originsettings.
viewer_certificate: Here the SSL certificate that CloudFront uses to terminate the SSL connection is defined. We reference the certificate which we have requested from ACM.
At the end we add two A records to the hosted zone for the main domain and its www subdomain to make Route 53 forward those requests to our CloudFront distribution.
Include the Websites module in the Main Infra
Now that we have a module for domain-specific resources, we can include it in our main infra code to deploy those resources for each of the provided domains (Certificate, CloudFront Distribution, DNS records).
Head back to the mian.tf file and add these:
provider "aws" {
  region = var.region

  default_tags {
    tags = {
      Owner   = "Bugfloyd"
      Service = "Bugfloyd/Websites"
    }
  }
}

provider "aws" {
  alias  = "us_east_1"
  region = "us-east-1" # ACM for CloudFront must be in us-east-1
}

module "websites_cert_cloudfront_dns" {
  source = "./websites"

  for_each = var.domains

  domain              = each.key
  hosted_zone_id      = each.value
  instance_public_dns = aws_instance.webserver.public_dns
  logging_bucket      = aws_s3_bucket.cloudfront_logging_bucket.id

  providers = {
    aws.us_east_1 = aws.us_east_1
  }
}Here we define the new module using module keyword and addressing its sub-directory in source argument and then loop through var.domains using for_each and ask Terraform to run the module for each one of them.
We also create a new alias for the main AWS provider by overriding the region to us-east-1 (for ACM certificates) and pass it to the module. Note that there is no need to also pass the default provider since Terraform does it by default.
Deployment
We made it! Now it is the time to deploy and test our setup. here we follow the same steps that we did while deploying the hosted zones.
Initialize Terraform
First create a backend configuration file to store the remote backend information using the same region and bucket name that we used in the above “Terraform Backend” section.
region         = "eu-central-1"
bucket = "bugfloyd-websites-tf"Note: This file should not be committed to git! Add it to your .gitignore file.
Now we can initialize the Terraform backend (state) by running this command in the infra directory:
terraform init -backend-config backend_config.hclDeployment
As before we define a tfvar file named terraform.tfvars and put the values there. As an example:
region                         = "eu-central-1"
ols_image_id                   = "ami-06132404beb88b9d2" # Your AMI ID
admin_ips                      = ["X.X.X.X/32", "Y.Y.Y.Y/32"]
admin_public_key               = "ssh-rsa AAA...32U= bugfloyd@laptop"
cloudfront_logging_bucket_name = "bugfloyd-websites.logs"
domains = {
  "bugfloyd.com" = "<HOSTED ZONE ID FROM EARLIER DEPLOYMENT>"
}- For
ols_image_iduse the ID you got earlier from AWS marketplace or the ID of your own custom AMI. - Make sure to use the same
regionthat AMI is also belongs to. - It is recommended to pass the admin IPs in single-host CIDR notation.
- For
admin_public_keyuse your public key value. It is normally stored in a place like~/.ssh/id_rsa.pub. If you do not have one, create one usingssh-keygencommand.
Note: This file should not be committed to git! Add it to your .gitignore file.
To deploy the resources to AWS:
terraform plan -out main.tfplan # Review the changeset
terraform apply main.tfplan
After a successful deployment you will see the output including the public IP address of your web server instance.
Yaayy! It is deployed! Now let’s configure it!
Web Server Configuration
Now we can configure the web server to properly serve our WordPress websites.
For the reference always check the official LiteSpeed documentation about this image and its configuration. The document can be even useful after switching to a custom solution if you keep using OpenLiteSpeed. Just a heads -up, we didn’t use all of its features like HTTPS and certificate management through Certbot.
I am not going to repeat that documentation here, but make sure to do the following main steps from it:
- SSH into the instance:
ssh ubuntu@<INSTANCE_IP> - On the first SSH session, the image is configures to run a configuration scripts which asks you a couple of questions and tries o configure your first WordPress website:
- Your domain: Enter the domain name without protocol and www subdomain. like
bugfloyd.com - Please verify it is correct: Y
- Do you wish to issue a Let’s encrypt certificate for this domain? N
- Do you wish to update the system now? Y (Then wait for the update)
- Your domain: Enter the domain name without protocol and www subdomain. like
Database passwords are stored in a file named .db_password under ubuntu user home. OpenLiteSpeed’s admin password is stored in a file named .litespeed_password under ubuntu user home. Get these passwords and delete these files.
cat ~/.db_password
cat ~/.litespeed_password By default Ubuntu firewall (ufw) is enabled and there is no allow rule for OLS admin console port. In general it is recommended to enable this port, do you thing and disable it! But in our setup considering the fact that the access to this port is restricted to our own IP address via AWS security groups, we can keep the port open on the instance firewall. To enable it:
sudo ufw allow 7080If you don’t feel comfortable having the port open and relying on AWS, you can instead only allow it to you own IP address on the instance level as well!
ufw allow from <YOUR_IP> to any port 7080Now you can access the OLS admin console by visiting https://<INSTANCE_IP>:7080.
To upload new files, use SFTP as explain on the LiteSpeed documentation and don’t forget to update the file owners and permissions after the upload.
There are also tons of useful information about how to access and secure phpMyAdmin, migrate existing website, troubleshoot possible issues and a lot more on the same documentation. One useful one is the automated script that they built to add new virtual hosts (websites) to your server. So in practice to add a new website to the setup you can add the domain to the hosted zoned infra, deploy it, get the hosted zone ID, add the domain and hosted zone ID to the main infra variables, deploy it, and run this script!
Also be aware that this image has a cool scripts to help you manage the server under /usr/local/lsws/admin/misc. One notable one is a script that you can use to reset your admin password if you forget it:
/usr/local/lsws/admin/misc/admpass.sh WordPress HTTPS Configuration
Now before continuing with WordPress installation, we need to configure one last thing to make the HTTPS work. By default when you do not set the certificate in the installation script, it configures WordPress to use the HTTP mode instead of HTTPS (remember that CloudFront is forwarding requests to instance’s 80 port and not 443). If you open the website on your browser, you will notice that the images, CSS and JS on the page are not being loaded because of the Mixed Content error (since you are visiting HTTPS, but the web server and WordPress are serving the assets in HTTP).
To address this issue we need to manually configure WordPress to use SSL. SSH into the instance, head to the WordPress files directory and edit wp-config.php. You have to use sudo since these files are owned by www-data user and group.
cd /var/www/html
sudo vim wp-config.php # or use nano if you don't know how to exit vim!Scroll down and right before the line saying “That’s all, stop editing! Happy publishing.”, add these:
/* SSL Settings */
define('FORCE_SSL_ADMIN', true);

/* Turn HTTPS 'on' if HTTP_X_FORWARDED_PROTO matches 'https' */
if (strpos($_SERVER['HTTP_CLOUDFRONT_FORWARDED_PROTO'], 'https') !== false) {
    $_SERVER['HTTPS'] = 'on';
}This PHP code:
- Enforces WordPress to always use SSL in admin dashboard.
- Checks to see if
CloudFront-Forwarded-Protohttps, it enables the HTTPS for the current request. CloudFront adds this header to the requests coming from HTTPS origin.
Now the HTTPS should work properly! And if you head to the website domain, you should see the lovely WordPress installation wizard!
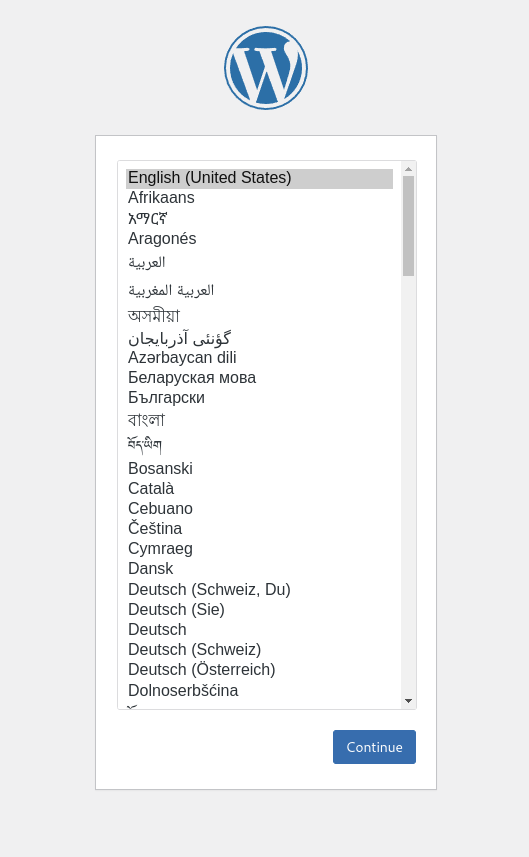
And you don’t need to even enter database connection details since those are already configured on your wp-config.php file by the initializer script.
Clearing CloudFront Cache
The Deployment (AWS) Costs
That’s it! Let me know in the comments if you got stuck somewhere and need help.